Introduction
3D scanning has changed the way designers, engineers, hobbyists, and makers recreate physical objects. Instead of building a digital model from scratch, users can scan an existing item and turn its shape into a digital 3D model. This approach is especially useful when working with small parts, replacement components, prototypes, collectibles, and detailed objects.
A small object 3d scanner is designed to capture the shape and surface details of compact physical items with greater precision. Once the scanning process is complete, the resulting model can be cleaned, edited, and prepared for manufacturing. However, choosing the right file format is just as important as capturing accurate scan data. Understanding different 3d printer file types helps ensure that the digital model moves smoothly from scanning software to a 3D printer.
What Is a Small Object 3D Scanner?
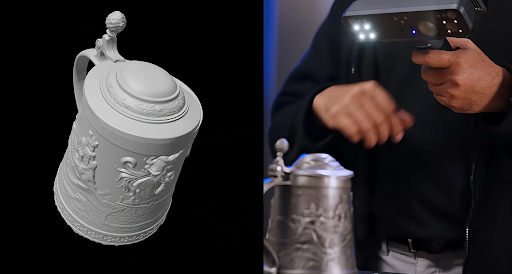
A small object 3D scanner is a device used to digitally capture the shape and surface of relatively small physical objects. Depending on the scanner, it may use structured light, laser technology, or other optical scanning methods.
These scanners are useful for objects that require detailed measurements. For example, engineers can scan small mechanical components before creating replacements. Artists can digitize sculptures or models, while product designers can inspect prototypes and compare them with their original designs.
The main advantage is speed. Instead of manually measuring every curve and dimension, a scanner can capture thousands or even millions of points from an object’s surface.
Why Scanning Small Objects Requires Precision
Small objects often contain fine details that are easy to miss. Tiny grooves, curved edges, holes, and surface patterns can have a major impact on the final digital model.
This is why resolution and accuracy matter when selecting a scanner. A device designed for large objects may not provide the level of detail required for miniature components.
Lighting and surface color can also affect scanning results. Highly reflective, transparent, or very dark surfaces may require additional preparation before scanning. Proper positioning and multiple scanning angles can also improve the final result.
How 3D Scanning Works
The scanning process usually begins by placing the physical object in a stable position. The scanner then captures information about its surface from one or more angles.
The software combines these individual scans into a single digital representation. Depending on the system, the result may initially appear as a point cloud or polygon mesh.
The user can then align different scans, remove unwanted data, fill small gaps, and improve the mesh. Once the model has been cleaned, it can be exported into a format suitable for CAD software or 3D printing.
From Scan Data to a Printable Model
A raw scan is not always ready for direct printing. Scanning software can produce a detailed mesh, but the model may contain holes, overlapping surfaces, noise, or unnecessary geometry.
Before sending it to a printer, users should inspect the model carefully. The mesh should ideally be watertight, meaning it represents a closed volume without unwanted gaps.
Some projects also require dimensional corrections. For example, a scanned replacement part may need its measurements adjusted so that it fits properly with another component.
This preparation stage can make a significant difference in print quality.
Understanding 3D Printer File Types
Different printers and slicing programs support different file formats. Understanding common 3d printer file types makes it easier to choose the correct format for a particular workflow.
STL is one of the most widely recognized formats in 3D printing. It describes the surface geometry of a model using triangles. Because of its simplicity and broad compatibility, STL is frequently used when transferring models into slicing software.
OBJ is another popular format. It can contain more information than a basic STL file and is commonly used when color, texture, or more complex model data is important.
3MF is a newer format developed specifically with 3D printing workflows in mind. It can store model geometry along with additional information in a single package, making it useful for modern printing applications.
Other formats may be used for specific workflows, especially when a scanned model needs further editing in professional CAD software.
Choosing the Right Format for Your Project
The best format depends on what you plan to do with the scanned model.
If you only need basic geometry for a standard printing workflow, STL may be sufficient. If the project involves textures or additional model information, OBJ can be more appropriate. For modern manufacturing workflows where multiple pieces of information need to remain together, 3MF can offer advantages.
Before exporting, check which formats your slicing software and printer support. This simple step can prevent compatibility problems later.
Improving Scan Quality Before Export
Good results begin before the file is exported. Take time to inspect the complete scan and remove unnecessary data.
Check difficult areas such as corners, holes, recessed sections, and narrow edges. If certain areas were not captured correctly, rescan the object from another angle.
Mesh repair tools can also help fix small holes and disconnected sections. However, excessive automatic repair can sometimes change important details. Manual inspection is therefore valuable when accuracy matters.
Applications of Small Object 3D Scanning
There are many practical applications for small-object scanning. Manufacturing companies can use it for reverse engineering and quality inspection. Designers can capture physical prototypes and convert them into editable digital references.
Hobbyists can scan discontinued components and recreate replacement parts. Museums and collectors can digitize valuable objects for documentation or virtual presentations.
The technology is also useful in education, product development, jewelry design, and customized manufacturing. As scanning equipment becomes easier to use, these applications continue to expand.
Combining 3D Scanning With 3D Printing
One of the most useful workflows is combining scanning and 3D printing. A physical object can be scanned, converted into a digital model, repaired, and then reproduced through additive manufacturing.
This process can save considerable time when the original CAD model is unavailable. It also allows users to modify an existing object before producing a new version.
For example, a broken plastic component can be scanned to capture its original shape. After repairing the digital model, the user can export it in a suitable printing format and create a replacement.
Tips for Better Results
To get reliable results, keep the object stable during scanning and capture it from multiple angles. Use appropriate lighting and follow the scanner manufacturer’s recommended settings.
After scanning, inspect the mesh before exporting it. Remove unnecessary geometry and repair visible gaps. Finally, confirm the selected file format works correctly with your slicing software.
It is also useful to keep an original copy of the scan. You can then create separate versions for editing, CAD conversion, or printing without losing the original data.
Conclusion
3D scanning provides an efficient way to transform physical objects into digital models. A small object 3d scanner can be particularly valuable when working with detailed components, prototypes, collectibles, and replacement parts.
However, scanning is only one part of the complete workflow. Cleaning the mesh, checking dimensions, and selecting suitable 3d printer file types are equally important steps. Formats such as STL, OBJ, and 3MF each serve different purposes, so the right choice depends on the software, printer, and project requirements.
By combining accurate scanning with proper file preparation, users can create reliable digital models and turn them into practical 3D-printed objects. This makes the scanning-to-printing workflow useful for professionals, makers, designers, and anyone interested in bringing physical objects into the digital manufacturing world.